- Overview
- Installing Theme and Plugins
- Demo Content Installation
- Getting Started
- Theme Options
- Sidebars / Widgets
- Setting the slider
- Setting the pages
- Setting the Blog
- Setting the Portfolio
- Setting the Team Members
- Setting the Testimonials
- Setting the Client's Logo
- One-page site
- Visual Composer
- Setting WPML Multi-Lanuage
- Translation
- Shortcodes
- FAQ
- Sources / Credits
Sidebars and Widgets
Widget Positions
Crafto has some built-in Widget Positions to use. Here are details of each position: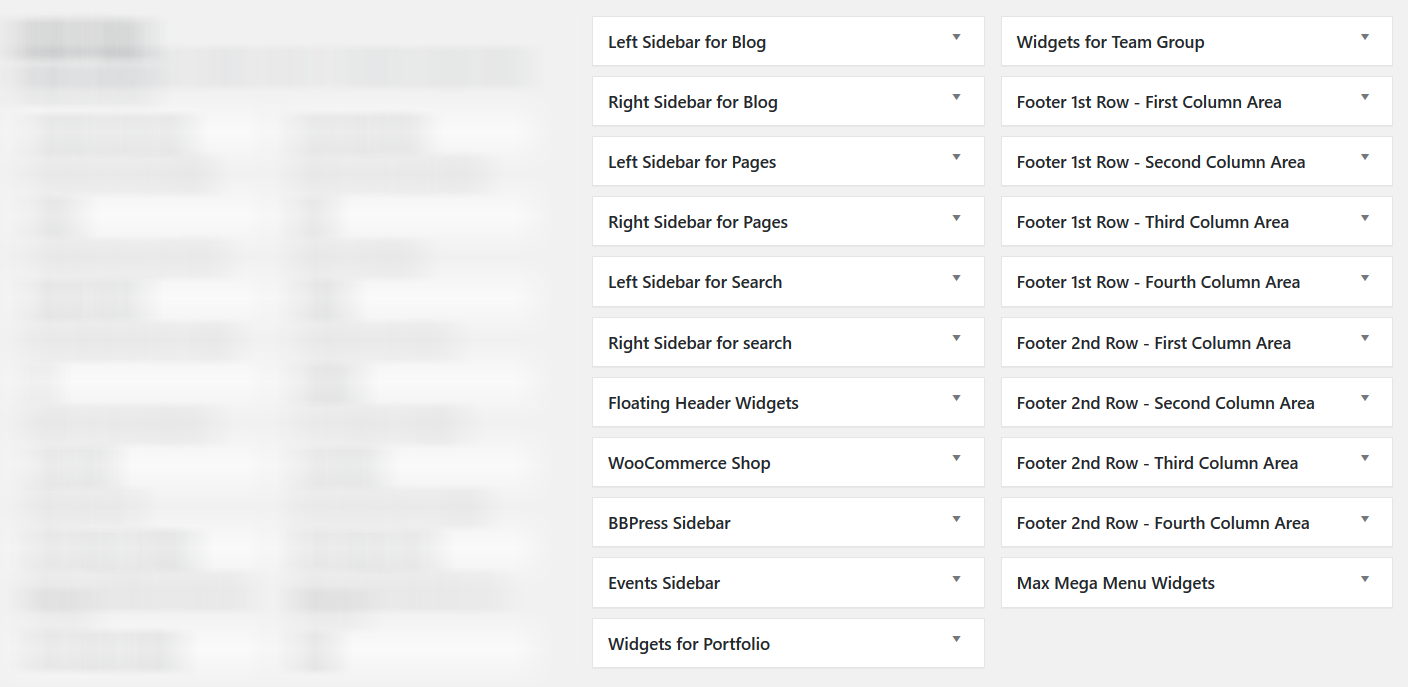
- Left Sidebar For Blog: You can add Widgets that you want to display as Left sidebar for (only) Blog pages like Calendar, Category, Tag, Archives etc pages.
- Right Sidebar For Blog: You can add Widgets that you want to display as Right sidebar for (only) Blog pages like Calendar, Category, Tag, Archives etc pages.
- Left Sidebar For Pages: You can add Widgets that you want to display as Left sidebar for pages that you created using Pages section.
- Right Sidebar For Pages: You can add Widgets that you want to display as Right sidebar for pages that you created using Pages section.
- Left Sidebar For Search: You can add Widgets that you want to display as Left sidebar for Search Results page only.
- Right Sidebar For Search: You can add Widgets that you want to display as Right sidebar for Search Results page only.
- Floating Header Widgets: Set widgets for Floating Header area.
- WooCommerce Shop: This widget position is specially created for WooCommerce pages only. You can add widgets like Cart, Login, Recently Viewed Products etc widgets here.
- BBPress Sidebar: This widget position is specially created for BBPress page only. You can add widgets of your choice to show on BBPress page.
- Events Sidebar: This widget position is specially created for Events pages only. You can add widgets like Calendar, Recent Events for Events page.
- Widgets for Portfolio: This is sidebar for "Portfolio" (portfolio category) sidebar.
- Widgets for Team group: This is sidebar for "Team Group" (Team group) sidebar.
- Blogroll Widget: This will be shown on Blogroll below slider.
- Footer 1st Row: First Column Area: This will be shown as 1st column in 1st row of footer area. You can set how many columns you like to show from "Theme Options > Footer Settings" section.
- Footer 1st Row: Second Column Area: This will be shown as 2nd column in 1st row of footer area. You can set how many columns you like to show from "Theme Options > Footer Settings" section.
- Footer 1st Row: Third Column Area: This will be shown as 3rd column in 1st row of footer area. You can set how many columns you like to show from "Theme Options > Footer Settings" section.
- Footer 1st Row: Fourth Column Area: This will be shown as 4th column in 1st row of footer area. You can set how many columns you like to show from "Theme Options > Footer Settings" section.
- Footer 2nd Row: First Column Area: This will be shown as 1st column in 2nd row of footer area. You can set how many columns you like to show from "Theme Options > Footer Settings" section.
- Footer 2nd Row: Second Column Area: This will be shown as 2nd column in 2nd row of footer area. You can set how many columns you like to show from "Theme Options > Footer Settings" section.
- Footer 2nd Row: Third Column Area: This will be shown as 3rd column in 2nd row of footer area. You can set how many columns you like to show from "Theme Options > Footer Settings" section.
- Footer 2nd Row: Fourth Column Area: This will be shown as 4th column in 2nd row of footer area. You can set how many columns you like to show from "Theme Options > Footer Settings" section.
Footer Widgets
Crafto comes with special widget positions for footer area:
The Footer Area is divided in TWO section. Those are First Row Widget Area & Second Row Widget Area. Here is some short description on each point.
First Row Widget Area: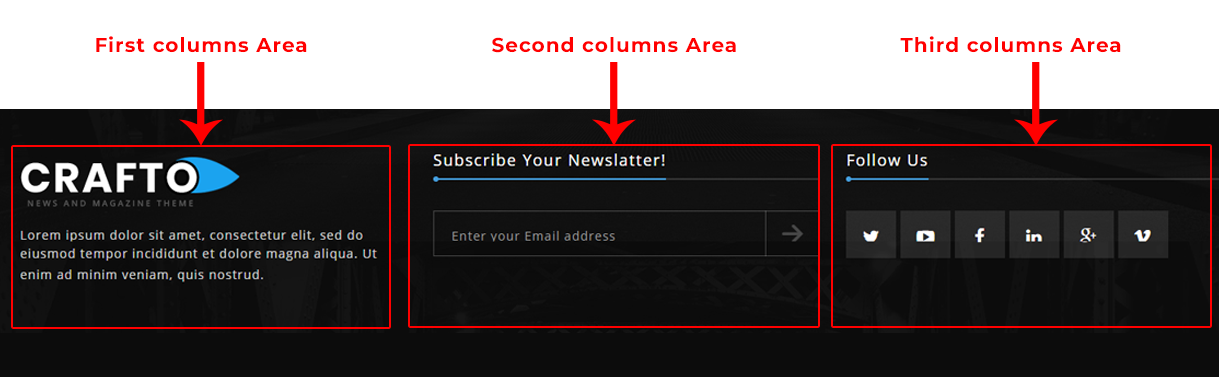
- First Footer - 1st Widget Area: This will be shown as 1st column in 1st row of footer area. You can set how many columns you like to show from "Theme Options > Footer Settings" section.
- First Footer - 2nd Widget Area: This will be shown as 2nd column in 1st row of footer area. You can set how many columns you like to show from "Theme Options > Footer Settings" section.
- First Footer - 3rd Widget Area: This will be shown as 3rd column in 1st row of footer area. You can set how many columns you like to show from "Theme Options > Footer Settings" section.
- First Footer - 4th Widget Area: This will be shown as 4th column in 1st row of footer area. You can set how many columns you like to show from "Theme Options > Footer Settings" section.
Second Row Widget Area: 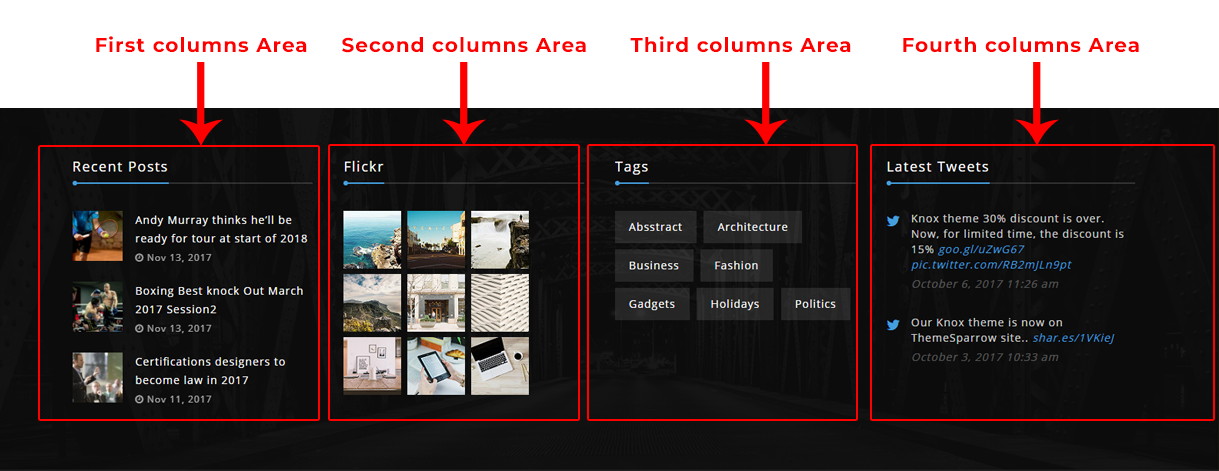
- Second Footer - 1st Widget Area: This will be shown as 1st column in 2nd row of footer area. You can set how many columns you like to show from "Theme Options > Footer Settings" section.
- Second Footer - 2nd Widget Area: This will be shown as 2nd column in 2nd row of footer area. You can set how many columns you like to show from "Theme Options > Footer Settings" section.
- Second Footer - 3rd Widget Area: This will be shown as 3rd column in 2nd row of footer area. You can set how many columns you like to show from "Theme Options > Footer Settings" section.
- Second Footer - 4th Widget Area: This will be shown as 4th column in 2nd row of footer area. You can set how many columns you like to show from "Theme Options > Footer Settings" section.
You can also change the column view of the Footer widgets. Just go to Admin > Appearance > Theme Options > Footer Settings section and change the "Select Footer Column layout View" option: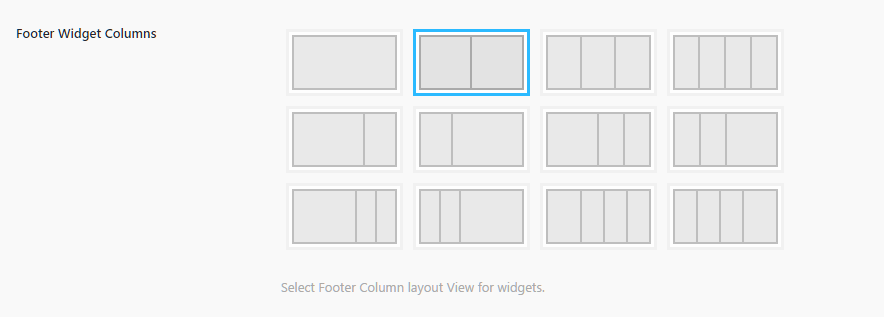
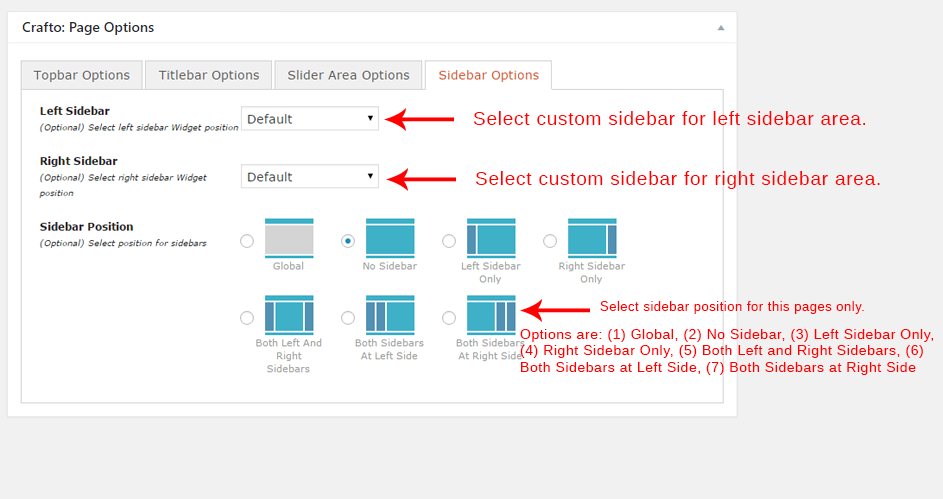
Sidebar options on Page
There is special settings box in page section (screenshot given below). You can select custom sidebar in the Left Sidebar and Right Sidebar options. The "Global" option will show widgets set in Widgets section.
Sidebar option in Theme Options
To change sidebar settings, go to Theme Options >> Sidebar in your admin panel.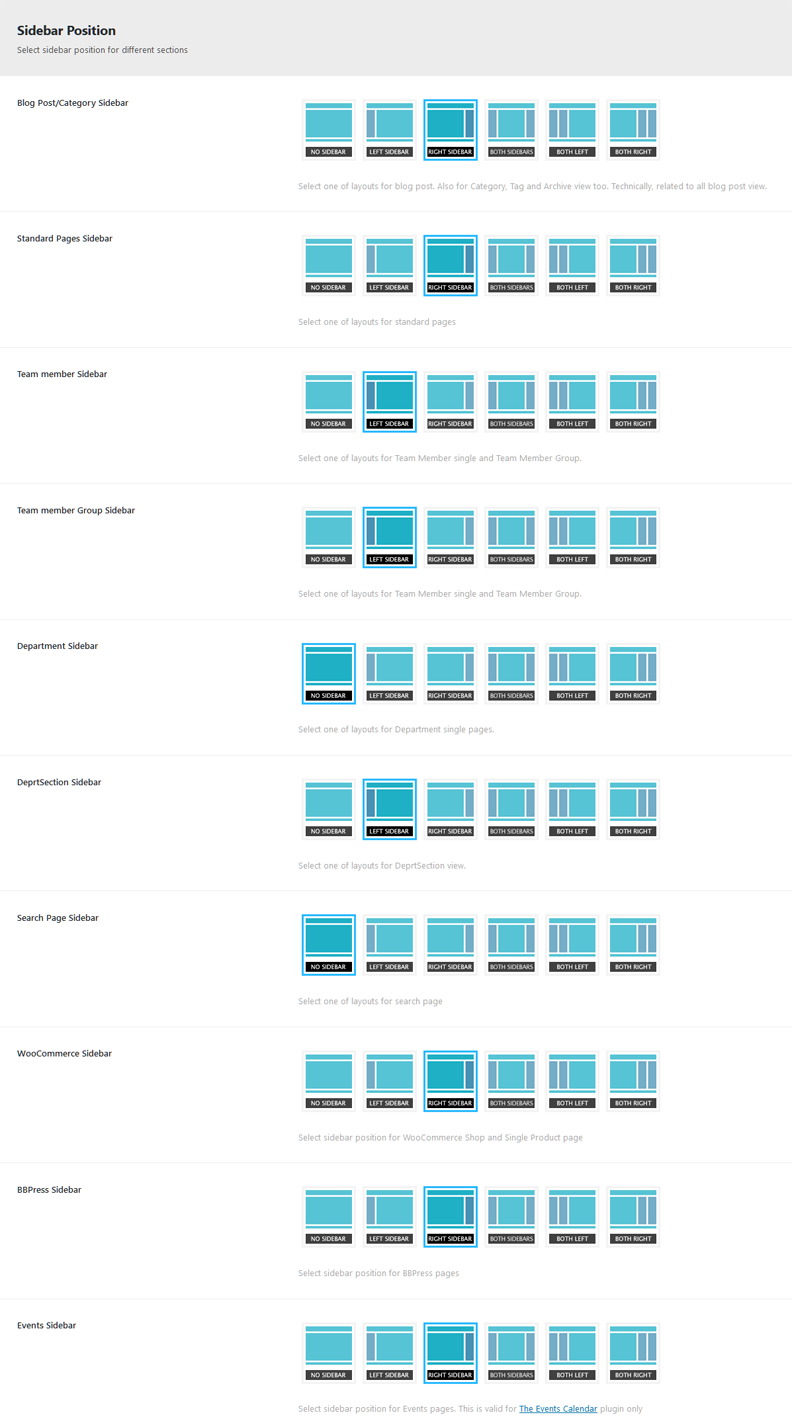
Widgets
Crafto theme provides some built-in widgets that you can use quickly without any external plugins.
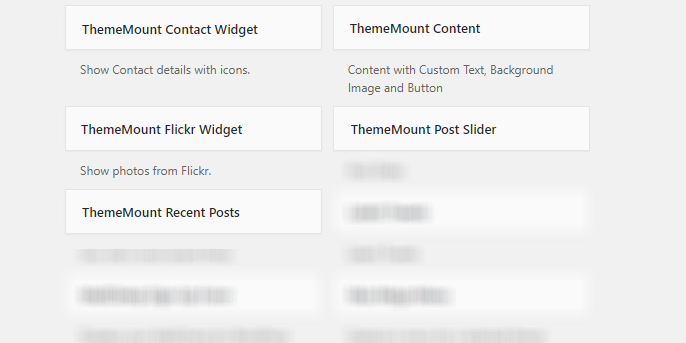
Built-in Widgets
- ThemeMount Contact Widget: This widget will show Contact details.

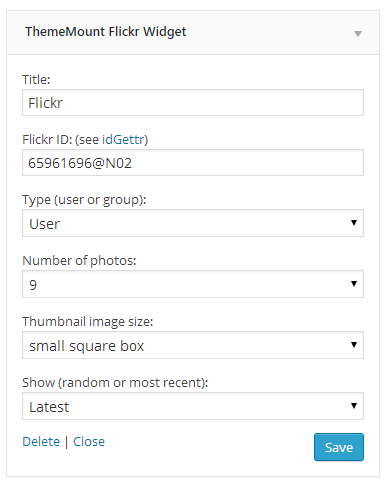
- ThemeMount Flickr Widget: This widget will show Flickr photos.
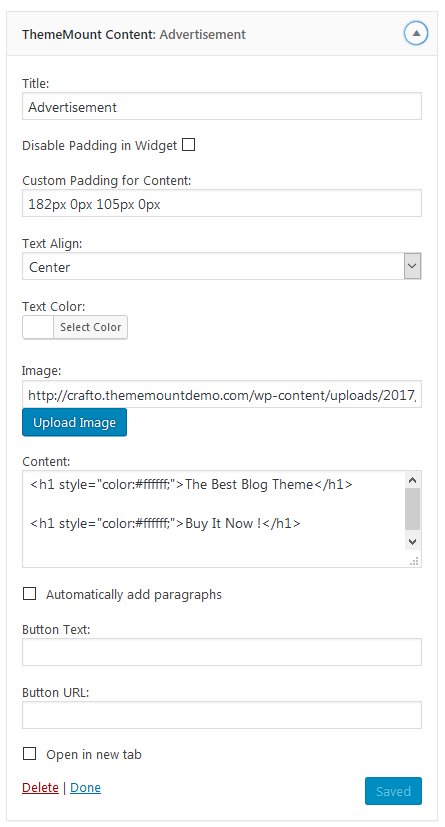
- ThemeMount Content: This widget will show your images with your title and description.
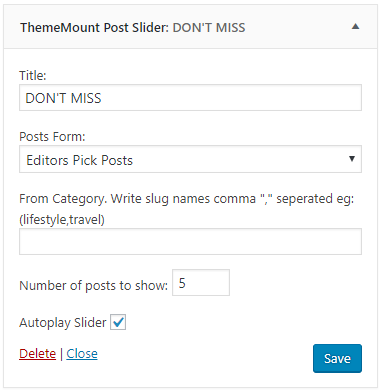
- ThemeMount Post Slider: This widget will show blog post in slider.
- ThemeMount Recent Posts: This widget will show recent blog posts.

Unlimited Sidebars
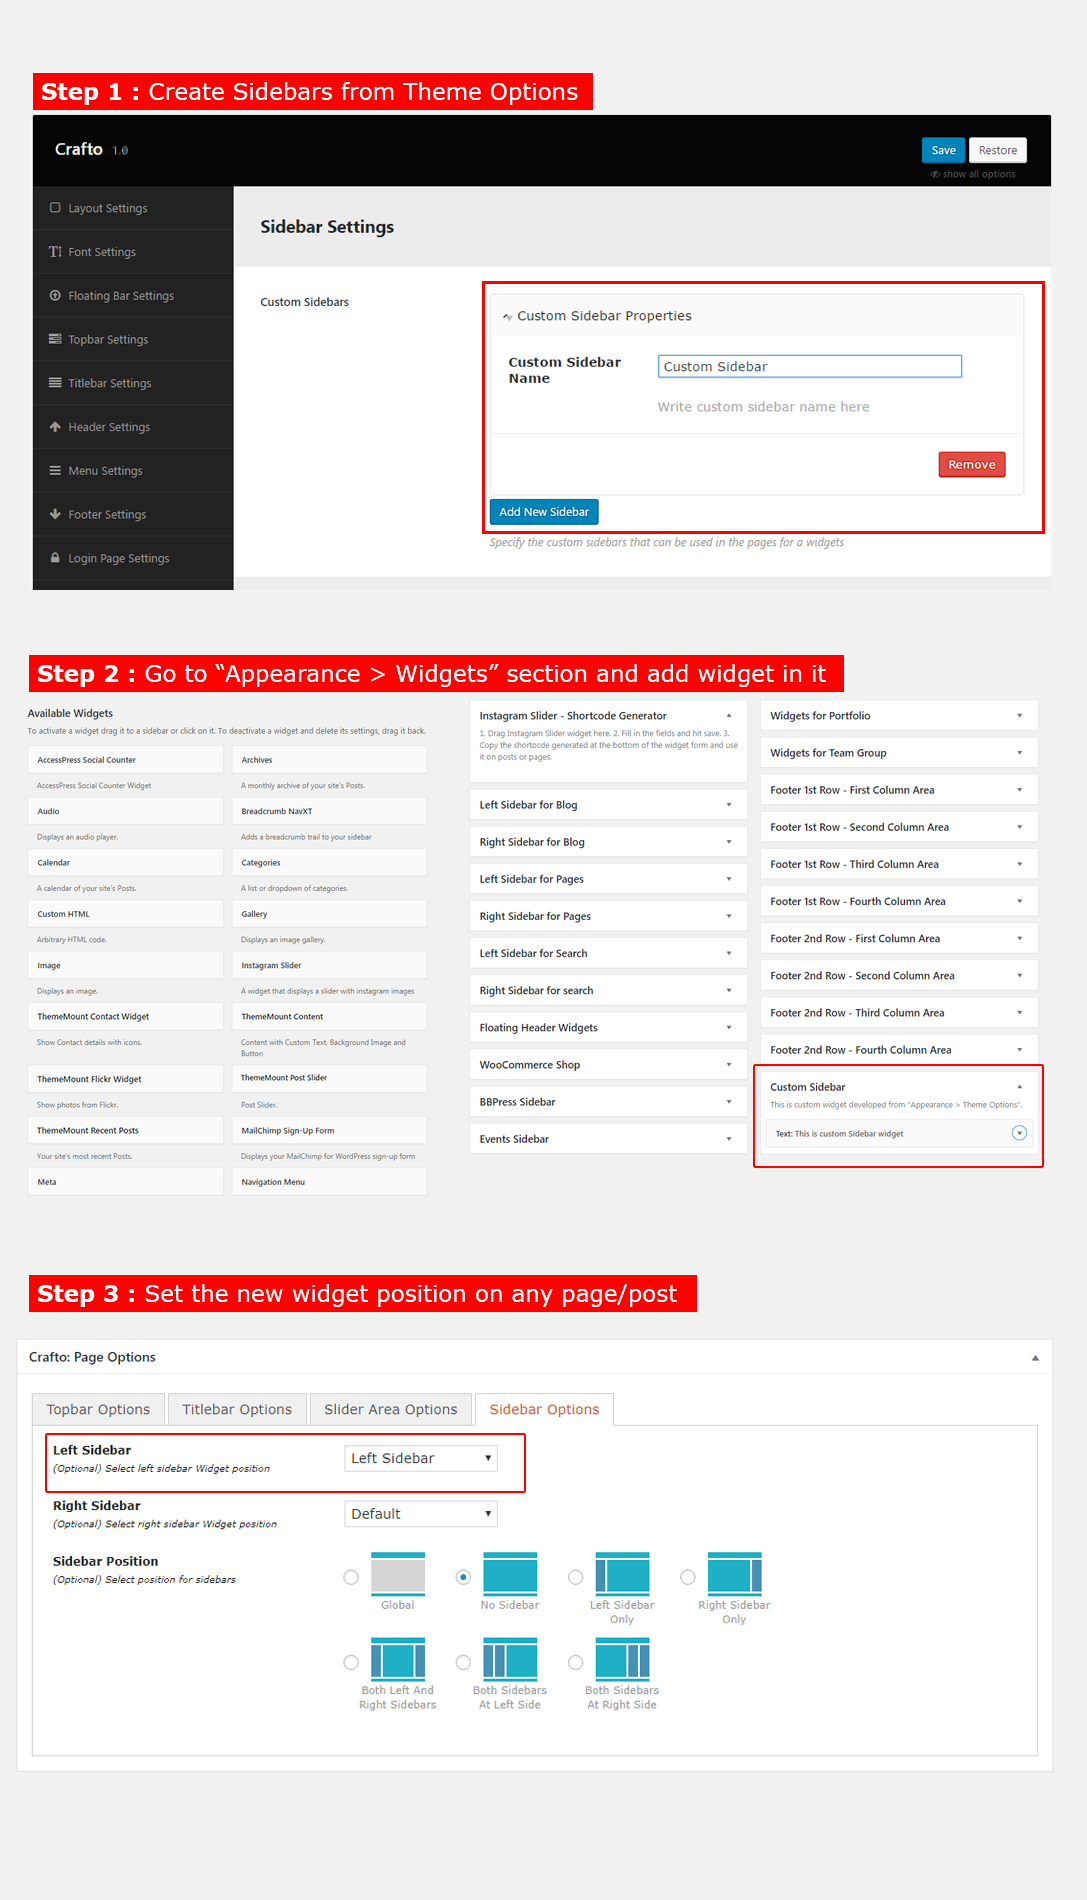
With Crafto theme, you can easily create unlimited sidebars and assign them to any page or post. We described all steps to use custom sidebar feature. Please follow steps given below:
- First we need to create some custom sidebars from Theme Options. So just go to Theme Options > Sidebar Settings section from your admin panel. Here you will find "Custom Sidebars" option. Just fill the sidebar name and save theme options. To add more sidebar, just click on "Add New Sidebar" button and add more.

- Now the sidebar is created, we need to
Custom created sidebars can be used on any Page. The custom created sidebars are available on all Pages to select. See screenshot given below: